M. JAHIN
IT Infrastructure Deployment, System Administration & Monitoring
IT Infrastructure Deployment, System Administration & Monitoring
By Md Muhtashim Jahin
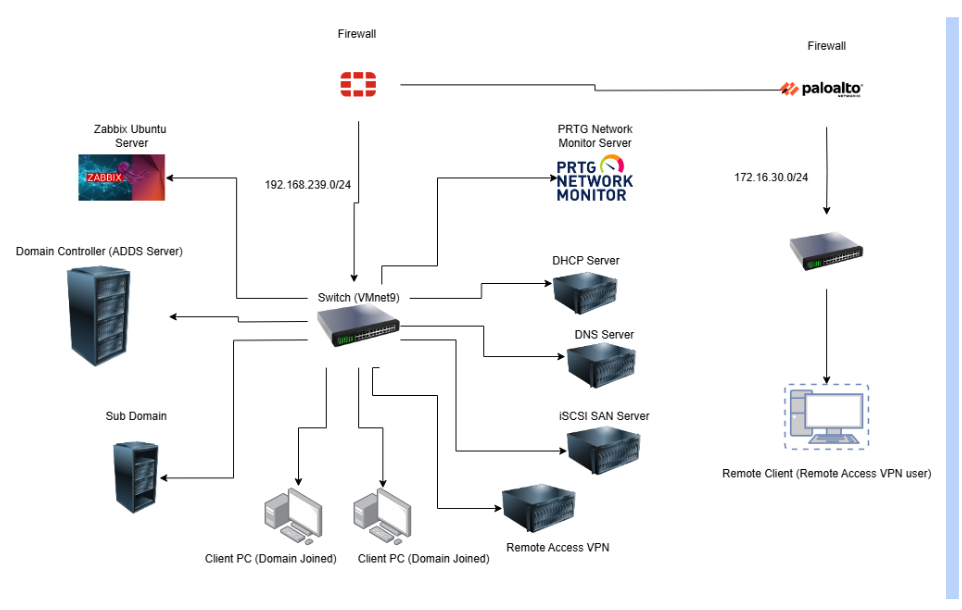
This project involved the end-to-end deployment of an enterprise IT infrastructure designed for centralized management, security, and monitoring. The infrastructure consists of 7 Windows 22 Servers, 1 Ubuntu Server, 3 Client Machines (Windows 10), 2 Switches, and 2 Firewalls (FortiGate & Palo Alto), all configured as a corporate network. PRTG Network Monitor and Zabbix are being used for Network Monitoring, Device Health, and Application Monitoring.
This project showcases my skills in IT Infrastructure Deployment & Design, System Administration, Network Configuration, Domain Management, VPN Implementation, Storage Provisioning, and Enterprise-Grade Monitoring using both PRTG Network Monitor and Zabbix Server & Application Monitoring.
Network Diagram
Services & Roles Deployed
- Deploy Domain Controller (ADDS Server) and add a client to the Domain (adatum.com).
- Sub-Domain Controller (bby.adatum.com).
- DHCP Server, Authorize the DHCP Server & Create a DHCP Scope
- DNS Server and Create Forward Lookup Zones (Secondary zone)
- iSCSI SAN Server
- Group Policy Objects (GPO)
- Remote Access Service (RAS) VPN Server
- Zabbix: Connect Servers, Firewall, and Clients to Zabbix for Device Monitoring.
- PRTG Network Monitor: Infrastructure Network Monitoring
Each Windows Server was assigned a dedicated role to ensure modular design and clear separation of services:
Active Directory Domain Services (ADDS) – Primary domain controller for centralized authentication.
Sub-Domain Controller – Facilitating organizational segmentation within the directory hierarchy.
DHCP Server – Dynamic IP address assignment across the internal network.
DNS Server – Internal name resolution for domain-based resources.
Remote Access VPN Server – Secure connectivity for remote users using RAS VPN.
iSCSI SAN Server – Centralized storage using iSCSI target services.
PRTG Monitoring Server – Real-time monitoring of network health, availability, and performance.
Zabbix Ubuntu Server is configured with Zabbix, providing Servers, Clients, and Applications monitoring and visibility.
Client-side implementation included:
2 On-Site Clients: One joined to the root domain and the other to the sub-domain, simulating department-based access and policy segmentation.
1 Remote Client: Securely connected via Remote Access VPN to simulate external workforce access to internal network resources
A FortiGate firewall was configured to manage traffic flow, implement security policies, and enable VPN services, while two network switches handled VLAN segmentation and internal communication.
Deploy Domain Controller (ADDS Server) and add a client to the Domain (adatum.com)
Installing the ADDS Role on our Domain Controller Server
- Log on to the server running Windows Server 2022 with Administrative Access.
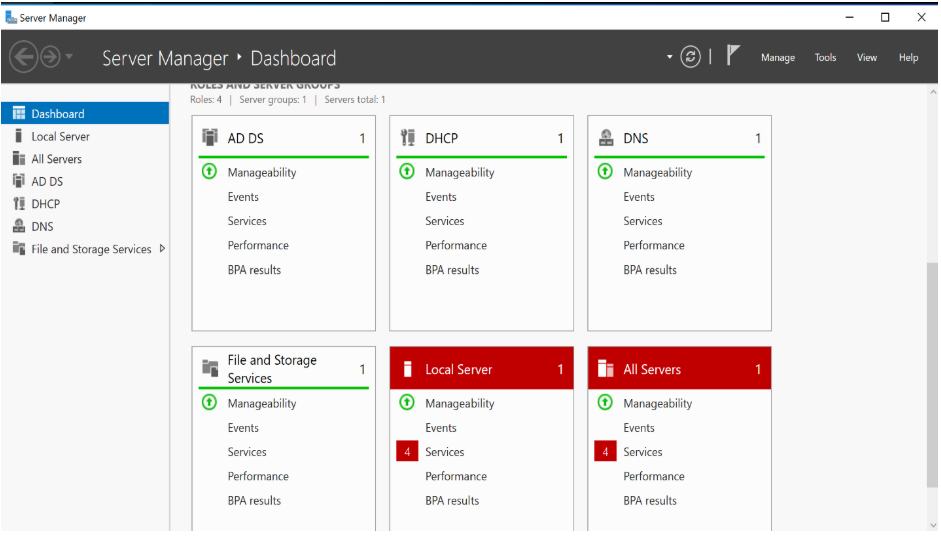
- Start Server Manager
- Click Manage > Add Roles and Features
- On the Select Installation Type page, Select Role-Based
- Select The Server you want to make the Domain Controller
- On the Server Roles Page, click the Active Directory Domain Services role.
- When you are prompted to add features, click Add Features to accept the dependencies and click Next.
- On the Confirmation Page, click install.
Promote the Server to Domain Controller
- Click on the Yellow Triangle of Server Manager and Promote this server to a Domain Controller
- In the Active Directory Domain Services Configuration Wizard, on the Deployment Configuration page, click Add a new Forest.
- Click Next on DNS options. It will throw an error message. Ignore it, because we don’t have any DNS role installed on this server.
- On the Prerequisites Check page, click Install.
- The Server will reboot
Add Client to the Domain
- Ping the domain server.
- Navigate to System and Security.
- Select the Computer name, domain, and workgroup.
- Add the domain.
Create a child domain (Sub-Domain)
- Create a new server and join the domain. Ensure that you ping the domain for connectivity assurance.
- Launch Server Manager, select Add role and features, and run the Add Role and Features Wizard.
- Click Next.
- Select Role-based installation.
- On Select Server, choose the newly created server assigned for the Sub-Domain.
- For the server role, select Active Directory Domain Servers.
- Add required features (You can keep the defaults, if you’re confused).
- Review the information page and click Next.
- Click install.
Promote the server to Domain Controller and configure it as a Child Domain.
- Click on the notification flag (a yellow triangle)
- Choose Add a new domain to an existing forest and Child Domain from the domain type. Provide the parent domain name, new domain name, and the credentials of an account that is part of the enterprise admin groups of your parent domain.
- Choose Domain Name System (DNS) server and Global Catalog (GC). Provide the DSRM password and click Next.
- On the DNS Options interface, on the “DNS Options” step, you will receive a warning. Review it and then click Next.
- On the Additional Options interface, this tab will take a few seconds to load. Check it the NetBIOS domain name is correct; if not, change it to the required one. When satisfied, click Next.
- On the Paths interface, click Next.
- On the Review Options interface, click Next.
- On the Prerequisites Check Interface, confirm that there are no issues, and then click Install.
Deploy a DHCP Server, Authorize the DHCP Server & Create a DHCP Scope
Deploy The DHCP Server
- Login to your Domain Controller.
- Launch Server Manager.
- Select Add Roles and Features.
- Select the server you want to deploy as DHCP Server.
- Select the DHCP Server check box. Choose the features you need.
- Confirm and Install the Server Role.
Authorizing the DHCP Server
- Open the yellow notification flag and click Configure DHCP configuration.
- Authorize the DHCP server to respond to DHCP Client requests. By forcing DHCP servers to be authorized, clients are protected from rogue domain-joined Windows DHCP servers that might maliciously affect network clients.
Create a DHCP Scope and Testing
- Open Server Manager and Click Tools>DHCP.
- Right-click on the IPv4 node and choose New Scope.
- Type a Name for the Scope and click Next.
- On the IP Address Range page, in the Start IP address text box, type the first in the range you want to assign. In the End IP Address text box, type the last address in the range. Choose the Subnet Mask you want to use.
- On the Add Exclusions and Delay page, enter the IP address you want to exclude from the DHCP Service, to assign those IP addresses as static IP addresses for better management.
- On the Lease Duration page, specify the leases for the addresses in the scope.
- On the DHCP Options page, select I want to configure these options now.
- On the Default Gateway, use the Edge Network Device IP address.
- Type the Parent Domain Name and DNS Server IP Address.
- Select Yes, I want to activate this scope now.
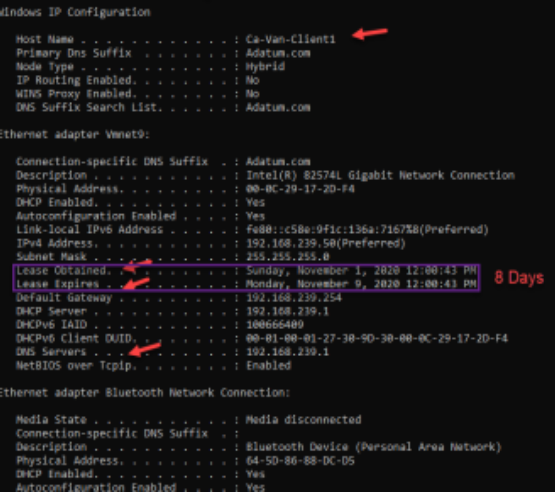
Test the DHCP Server
- Login to your Client. Release the IP using iconfig/release and renew the IP using ipconfig/renew.
- Type ipconfig/all in CMD
Congratulations! The DHCP Server is working.
Deploy DNS Server and Create Forward Lookup Zones (Secondary zone)
Deploy the DNS Server
- Create a new server and join the domain.
- Install DNS Server Role.
Configure Forward Lookup Zones (Secondary Zone)
- Launch Server Manager and Click Tools>DNS.
- In DNS Manager, right-click Forward Lookup and select New Zone.
- In the Zone type, choose Secondary Zone.
- Type the name of Domain for which you are configuring DNS. Since the domain (adatum.com) has been installed, I will use adatum.com.
- On the master DNS Server, you must type the IP of your domain.
- Go to DNS Manager again and right-click to choose properties.
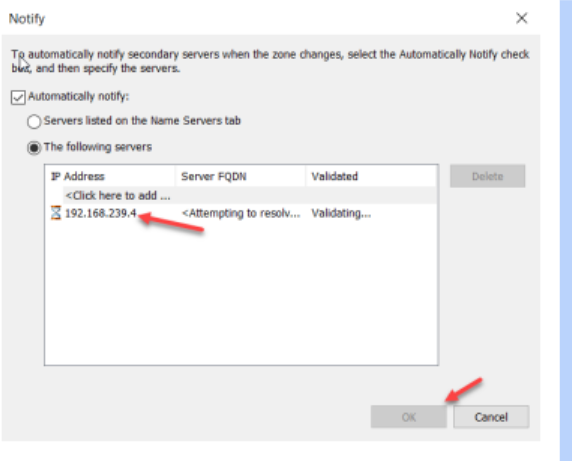
- On the Zone Transfers tab, enable “Allow Zone Transfers”. Choose the Server IP so that the main DNS zone file can be copied to our Secondary Zone.
iSCSI SAN Server
Multiple protocols can be used to configure SANs. Fiber Channel SAN is expensive to implement. iSCSI SAN storage gives us an inexpensive and simple way to configure a connection to remote disks.
Create a Storage Pool and a Storage Space
- Add at least 5 Hard drives to the Server to create a three-way mirroring.
- Turn on the server and launch Server Manager.
- Go to File and Storage Services>Storage Pools. Refresh if you cannot find any disks from the Physical disks.
- Click “New Storage Pool”.
- In the Storage Pool Name Field, type a name for storage space.
- Select the disks for the pool and Click Create.
Create New Virtual Disk
- Right-click on the storage pool and then choose New Virtual Disk.
- On the virtual disk name, give a name.
- On Storage Layout, choose Mirror.
- On Resiliency Settings, choose three-way mirror.
- Choose Thin Provisioning.
- Specify the Size.
- Click Create.
Install iSCSI Target Server
- Go to the Domain Controller Server and install the iSCSI Target Server role.
- Select Role-Based installation.
- On the Select Destination Server page, expand File and Storage Services, expand File and iSCSI Services, and click iSCSI Target Server and iSCSI Target Storage Provider. Click Next.
- Click Install
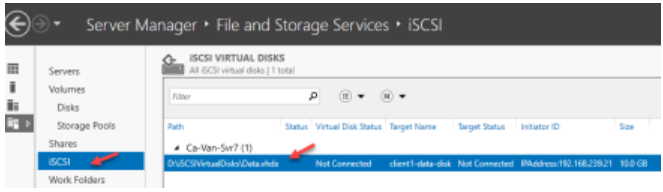
Create an iSCSI Virtual Disk
- Go to File and Storage Services and then click iSCSI.
- On the Select Virtual Disk Location page, click a drive to store the iSCSI virtual disk and then click Next.
- Give a name for the iSCSI Virtual Disk.
- Specify the iSCSI Virtual Disk Size.
- On the Add Initiator ID page, for the type, select IQN, DNS Name, IP Address, or MAC address. Then, in the Value text box, type the corresponding value for the initiator that matches the type.
- Click Create.
Configure iSCSI Initiator
- Login to your client, which one you have used for the iSCSI Initiator ID.
- Go to iSCSI Initiator properties, type the iSCSI Server IP Address, and Quick Connect.
- Check the Discovery > Target Portals.
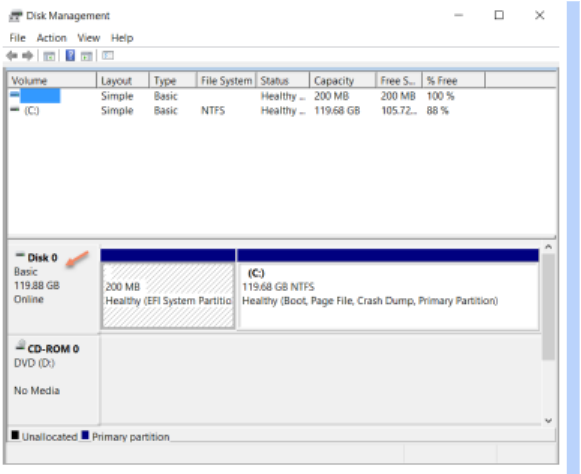
- Go to Disk Management. You will find an unknown disk.
- Initialize it, and you are done.
Remote Access Service (RAS) VPN Server
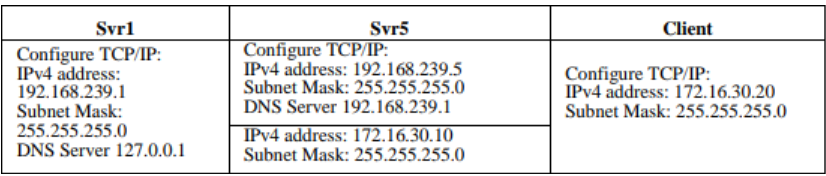
If you are doing it on a Virtualized Environment, then make sure to use a different Network Adapter on your Remote Client and add another adapter to your RAS VPN Server. If you are in a real environment, deploy a separate client and create 2 Firewall Policies to send and receive packets from 192.168.239.0/24 and 172.16.30.0/24 (Remote) subnets.
DC Server RAS VPN Server Remote Client
Install and Configure Remote Access Service (RAS) VPN
- Login to the RAS VPN Server and install Remote Access via Server Manager.
- Launch the Getting Started wizard, and in the tab, click Deploy VPN Only
- It then opens the Routing and Remote Access MMC. Right-click on the Server name and choose Configure and Enable Routing and Remote Access. On the Routing and Remote Access Server Setup Wizard, choose custom configuration.
- Select “VPN Access”.
- After you have clicked finish, you can now start the Routing and Remote Access service.
- Go to the “Properties” and change the number of clients for better performance.
Configure the Windows Firewall
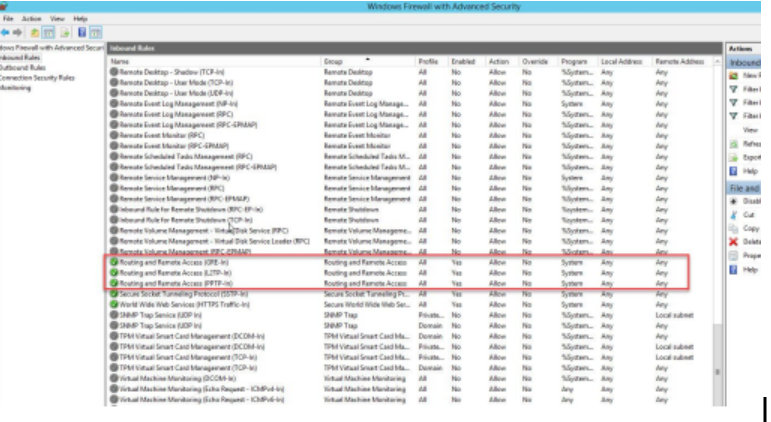
Create VPN Group and VPN User
- Login to the Domain Controller and create an OU, a group, and add some users to the group. In my case, OU(Adatum), group (Adatum VPN Group), and General users like Jahin.
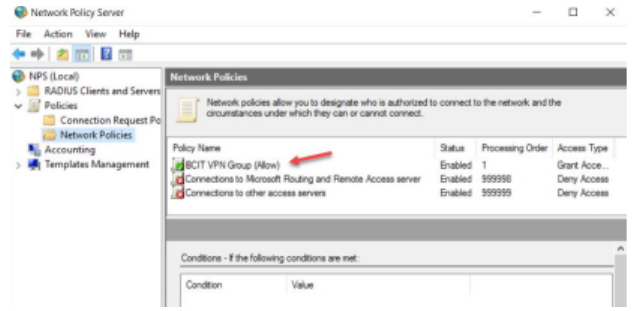
Configure Network Policy Server
Network Policy Server performs centralized authentication, authorization, and accounting for wireless authenticating switches and VPN connections.
- Login to the VPN Server as Admin and Launch Server Manager.
- Go to Routing and Remote Access>Remote Access Logging & Policies and then launch NPS.
- Create a new Network Policy. Type the Network Policy name as “Adatum VPN Group” and select “Remote Access Server (VPN-Dial up)”
- Add user group “Adatum VPN Group”
- Set up Network Policies according to your organization’s preference.
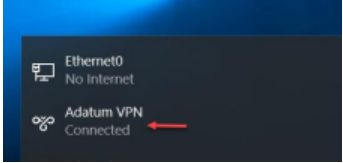
Configure Remote Client (VPN Client)’
- Go to Settings>Network & Internet>VPN>Add a VPN connection.
- For VPN Provider, choose Windows (built-in). In the Connection name box, type a friendly name (Adatum VPN) for the VPN Profile.
- For the VPN Type, choose the type of VPN connection you want to create (PPTP).
- Select Save.